| Information 5 |
|
Trailbike Tips |
|
| Information 5 |
|
Trailbike Tips |
|
|
|
Tool bag An essential bit of kit to keep your odds and ends in, mine contains a small good quality socket/screw driver set, a multi tool, spare clutch/ brake levers and a small torch for night time repairs, I also take food and drink. Pack any space with a ravelled up carrier bag to stop things rattling about.The bag itself is actually a sturdy cycle bag that would normally be placed under the seat, fit in place using bolts through the rear mudguard. |
 |
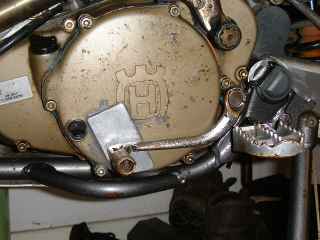 |
Cover-plate protector
After having dropped the bike onto something solid whilst opening a gate and causing the gear lever to crack the cover plate - I decided to fabricate an aluminium protector. This was fixed in place using Unibond 'metal replacement' glue (from B&Q) - which was also used to repair the crack. New cover plates are around the £100 mark. Suzuki DRZ400's are susceptable to the same problem so this is well worth doing on many trailbikes. |
| Hand Guards
The biting cold weather we frequently get make these a good buy. I have tried cheaper inferier makes which were no good until I settled with Acerbis Rally Brush Handguards combined with Acerbis Spoilers - avoid the 'clear' ones as these are too brittle and will easily break. Handguards, as well as deflecting the cold wind, will protect the levers if (when!) you drop the bike. Also shown in the picture is wire around the grips to stop them spinning - this can occur when the bar ends get muddy and wet. |
 |
|
Hot engine restart Many 4 strokes can be difficult to restart after a fall, this is due to flooding or vapourization of the petrol in the carb because the engine is very hot. Husqvarna's (and others) have a reputation of being difficult to restart under such situations - and I had problems with mine at first, but the solution is .. if it will not restart with the first couple of good kicks on the kickstarter, then pull in the decompressor, press the engine kill switch and, using NO throttle, slowly kick the engine over 6-7 times, let out the decompressor and slowly kick until Top Dead Centre (TDC) is found (when the kick starter meets more resistance), let the kick starter return to its top position. Now give it a good kick and it should restart first time. |
 |
Front Sprocket
I reduced the front sprocket size from 15 teeth to 12 teeth - this gave an approximate 20% reduction in overall gearing, this makes for better low speed control in the bottom 2 gears, and particularly lower speeds down steep descents which is definitely desirable.I also cut a hole in the plastic protecter cover - this enable the mud to be washed out easier at the end of the day. |
| Brake Levers and Mirrors
Hand guards do not always save your levers in a heavy spill. Here the end knob has broken off, but rather than replace it and have it happen again - just file it smooth (so as not to cut your gloves) and continue using (NB: it'll not pass the M.O.T. like this !) Mirrors ... most people take them off to avoid them getting broken, but I like to see whats going on behind me - use mirrors with a flexible joint so it will deflect out of the way in a spill - as shown here. |
 |
 |
Head Lamp
Some sort of mesh-style head lamp guard would be a good idea to protect the delicate glass lens, but if like me you've left it too late and don't fancy spending £60 plus for a new one - then why not replace it with some clear perspex. Make sure its angled correctly so as not to dazzle oncoming drivers and remember it is not legit for the M.O.T. test. It will the last time the throttle-happy rider ahead breaks your head lamp ! |
|
Steamy Goggles Its cold out, a bit of drizzle and you're sweating like a pig - result ! Steamed up goggles, sooner or later a bind to all trailriders. Over the years I've tried loads of different anti rain/anti fog type products - Anti mist cloths, Rain X etc etc - none of which seemed to work as well as they say on the box .. But maybe something you haven't tried which seems to be fairly effective are double glazed goggles, yes they do exist ! If you're using some of the popular Scott goggles, then replacement 'double' lenses are available for around £10 which just clip in place. Scott Enduro goggles (£32) come with double lenses already fitted and are better vented than most and therefore are more effective at not steaming up. |
|
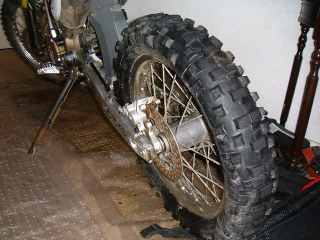
Tyres Correct 'off-road' style tyres are a neccessity if you don't want to be the one who always gets left behind or gets stuck ! I am not always keen on fitting Motocross tyres because of the reduced grip on tarmac and because of the boys in blue ! I fit Michelin Enduro Competitions which are road-legal (look for 'MST' on the tyre wall), fit the medium hardness as the soft ones wear out too quickly. These tyres grip well in the rough stuff, self clear okay and offer decent tarmac grip. Inflate to 12-15 psi. |
 |
 |
Map Reading
If you are 'team leader', that is you are leading a run then you are going to be able to read your maps with ease. I've found that Halfords map holders shown here are ideal, they are the right size, are waterproof and come with velcro fasteners that fit easily and neatly around the handlebars. On top of that they only cost around £6 and do not impede your riding in any way. |
| Spare Petrol Container
Many trailbikes only have smallish petrol tanks (mine holds around 2 gallons - enough for approx 100 miles of riding). If like me you ride in an area where petrol stations are few and far between then a spare petrol carrier can only be a good idea. Make sure it is designed to carry fuel like the one I use (right), these types are generally used for camping and are very strong. It only holds 500ml but is good for 10 miles riding to the next petrol station in an emergency - beats pushing ! |
 |
|
Getting through mud Okay I know we should avoid muddy lanes but sometimes it can't be helped. Start off with little throttle and combined with clutch control start off avoiding wheel spin. Picking up speed and using momentum is often the best way through mud and peat. If you feel you are losing traction then try blipping the throttle - this can throw mud out of the treads and help you regain your grip. Also try bouncing on the footpegs and leaning back putting more weight on your back wheel - this can make your tyres bite into more solid terrain helping traction and forward movement. |
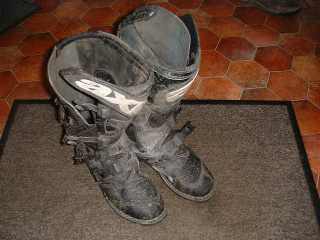 |
Boots
Don't compromise on boots, if you want good ones then you will need to pay £150+. You want adjustable buckles and they need to be big enough to wear 2 pairs of socks (one waterproof). Some claim to be waterproof - in action very few are ! Motocross boots look okay but have smooth soles which are not best for trailriding, shop around and look for some with good treaded soles .. you will need them when pushing through mud. Make sure they are sturdy in case you bang you leg against rocks at speed or the bike falls on your leg. |
|
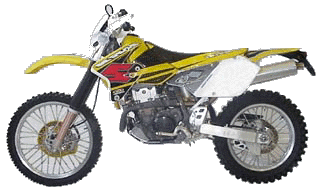
Graphics Why not give your bike a bit of individuality? Most trailbikes only come in 2 or 3 different colour schemes so third party firms produce graphics to replace the originals. For instance, £50 will make your Suzuki DRZ400 look like this (right), the original stickers - it is fair to say - are cheap and nasty and do not to stand up to much abuse. Another £50 will get you a quality matching seat cover. These are available from various firms such as Leisure Trail, Sandifords and Dirt Bike Bits amongst others |
 |
|
Dealing with Ruts One of the toughest terrains to contend with while trailriding can be ruts, not just crossing them but riding in them. I've found that riding slowly is not the answer, all it does is induce wobble into your riding style. Try to keep your speed up so that the bike wants to ride straight, keep you eyes approximately 5-10 yards ahead of you so you can see in advance any obstacles looming .. looking down towards the front of your wheel is instinctive - but not the best method ! Stand up on the foot-pegs, this not only lowers your centre of gravity(your body weight acts through your feet as opposed to through your seat) but it leaves you in a position to manouveure your body to counteract any imbalance ... trials riders don't stand up for nothing, it also enables your legs to act as 'shock absorbers'. |
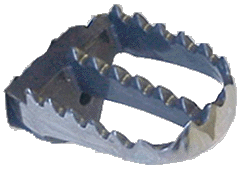 |
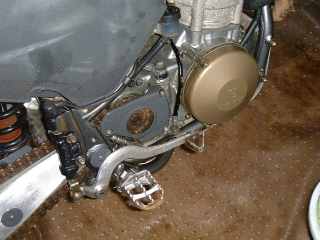
Footpegs
Several trailbikes come equipped with small footpegs which can be uncomfortable after a long days riding. Other more 'enduro' based models have larger footpegs which give more grip and are more comfortable. You can upgrade your footpegs by buying footpeg-extensions which are welded onto the originals. I'd be more inclined to completely replace with larger items as shown left, these can cost around the £50 mark and are available from suppliers previously mentioned. Always remove any rubber-inserts from existing pegs - these can be slippery in the wet. |
|
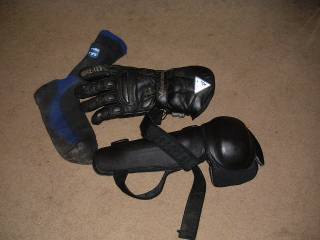
Clothing Decent clothing can make or break a good days trailriding - remember those long cold wet rides home in winter ? Get a good thick jacket that has elbow, shoulder and back protecters built in. Experience has taught me that knee protectors are a good idea (mine are Dianese) - you don't always land on soft grass when you fall off. Waterproof socks (pref. Goretex but Porelle adequate) are essential as are 2 pairs of gloves - one thinner for riding and some thick warmer ones for the long haul home. |
 |
 |
Punctures
The last time I got a puncture I didn't realise until I was nearly home when I noticed the handling was poor as the tyre slowly deflated. On repairing and to minimise it happening again. I fitted heavy duty inner tubes - these cost around £10-12 but are much less likely to puncture. I used a product (shown left - not to scale) like 'Slime' - this sealant is installed into the inner tube and doesn't dry - but a punture causes the liquid to congele around the hole sealing it. If you need to blow your tyres up on the trail then use compressed air cylinder /adapters as shown, these take up minimal space and are less than £10 with spare cylinders. |
|
10 Riding Tips 1) Going into a corner too fast ? Ease on the front brake to load the front end and maximiize traction. 2) It is always better to stand while riding, Hitting a fast bump can bounce you over the bars when sitting. 3) Legs aching from too much standing up ? Sitting down on the smooth sections even momentarily will bring much needed relief. 4) Terrain getting a bit bumpy ? Grip the tank with your knees - leaving your arms relaxed to steer. 5) Keep your elbows bent outwards - this gives you more wrist movement to control the throttle. 6) Try and keep an even throttle - sudden acceleration can only make you lose traction. 7) Can't avoid that rock ahead - try to hit it square on so it doesn't roll sideways from under your front wheel. 8) If climbing a rocky hill, accelerate as you approach it so you have momentum to reach the top. If you have to stop part way up you will struggle to regain traction. 9) When climbing - stand up and lean right forward - with as much weight as possible over the handlebars. 10) If things go pear-shaped on a steep climb and you have to jump off your bike, then try to make sure you are on the 'high' side so the bike does not fall on you. |